What is Selenium Grid?
Grid allows us to run test script parallel across all the node system. This will give lot of advantages as the traditional test script limits on running test on the host system only.
Allows you to run test on vast combinations of both OS and Browsers, from a single point making it easy for also managing Test.
Hub and Node
The Selenium Grid architecture works in the form of Hub and Node, where there will be only one Hub and one or many Node will be connected to it.
These nodes can be of any system i.e, like Windows, Linux and Mac running with different web browser application like Firefox, Safari and IE.
So you can write a single Selenium test and run it parallel on all the different system connected to it.
Executing Test Script in remote system or node
Follow this simple steps to setup your selenium grid and running your first Selenium RC code,
1. Install the selenium jar for Selenium Standalone server. Use the link Click to Open.

2. Registering Hub : Move to the directory were Server standalone is place, copy your WebDriver to the same directory and open command prompt. Run the below command to start and register Hub,
java -jar selenium-server-standalone-<version>.jar -role hub
If started successfully then you will see the same following lines highlighted in the above pic. To verify if its working visit the this link http://localhost:4444/grid/console in the browser (whose WebDriver you placed on the directory with Server standalone.)
By default Server will run on port 4444 and you can use localhost as you are opening and checking browser in the same system.

3. Registering node to Hub : Copy and place the standalone server and WebDriver for test wish to run on in a directory, remote system must be connected to same network or firewall setting change has to be done for accessing them. For this example I will be running windows 7 on VM as my node system.

Note : The Node system should have Java installed and Java to be added into environment variables.
Open Command Prompt and run command, java -Dwebdriver.<Browser name>driver ="Path to the web driver" -jar selenium-server-standalone-<version>.jar -role node -hub http://<Hub system IP>:4444/grid/register

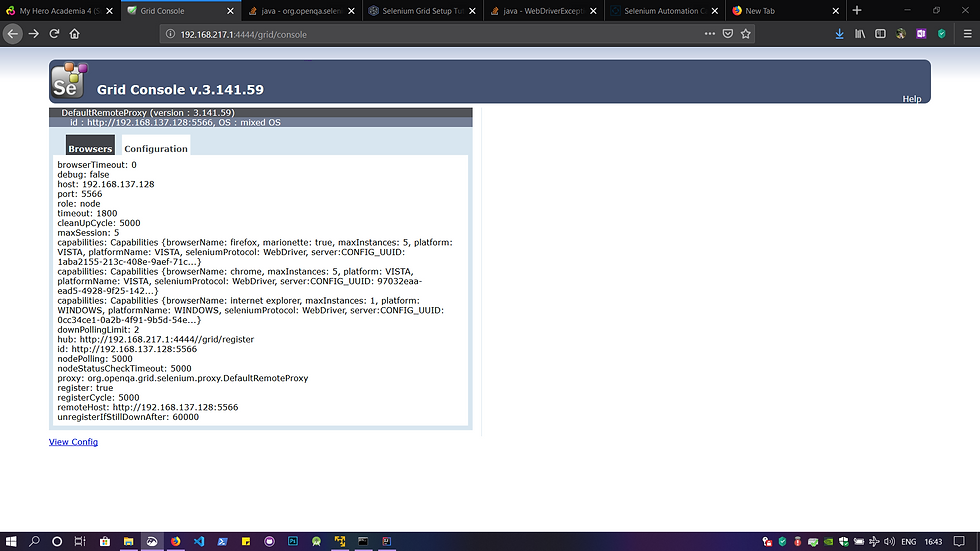
To check for successful registration, reload the http://localhost:4444/grid/console where now you will see the list of node registered to the Hub.

You can see how many instance of each test can be ran on the browser and the node configuration in the console.

4. Executing the Test script on Node from Hub :
CODE
import org.openqa.selenium.Platform;
import org.openqa.selenium.WebDriver;
import org.openqa.selenium.remote.DesiredCapabilities;
import org.openqa.selenium.remote.RemoteWebDriver;
import java.net.MalformedURLException;
import java.net.URL;
public class Selenium_grid {
    public static void main(String[] args) throws MalformedURLException {
        DesiredCapabilities dc = new DesiredCapabilities();
        dc.setBrowserName("internet explorer");
        dc.setPlatform(Platform.WINDOWS);
        WebDriver driver = new RemoteWebDriver(new URL("http://localhost:4444/wd/hub"),dc);
        driver.get("https://google.com");
    }
}
EXPLANATION
Writing Test is same as the regular test but we have to set DesiredCapabilities to specifiy the particular node to run test on, we can specify this by machine, IP, OS, Browser name, Browser Version..etc.
DesiredCapabilities dc = new DesiredCapabilities(); dc.setBrowserName("internet explorer"); dc.setPlatform(Platform.WINDOWS);
Specify the Hub in WebDriver
WebDriver driver = new RemoteWebDriver(new URL("http://localhost:4444/wd/hub"),dc);
Then proceed with the writing regular test script, here we will get opening Google on our browser.

5. Selenium Automation Capabilities
To know more about capabilities refer the below embedded page. Source Click to Open.